DIY Project Budget Planner Excel
Here’s an HTML representation of content about DIY project budget planning in Excel, approximately 1000 words: “`html
DIY Project Budget Planner in Excel: A Step-by-Step Guide
Embarking on a DIY project, whether it’s renovating a bathroom, building a deck, or crafting a piece of furniture, is exciting. However, the thrill can quickly fade if you don’t have a solid budget in place. Overspending is a common pitfall for DIYers, often leading to unfinished projects and financial stress. Fortunately, Microsoft Excel provides a powerful and flexible platform for creating a detailed and effective budget planner. This guide will walk you through the process, step-by-step, helping you stay on track and achieve your DIY goals without breaking the bank.
Why Use Excel for DIY Budgeting?
While specialized budgeting apps exist, Excel offers several advantages for DIY projects:
- Customization: You have complete control over the categories and level of detail. You can tailor the spreadsheet to perfectly match the specific needs of your project.
- Flexibility: Easily adjust formulas and calculations as your project evolves. Add or remove line items as needed.
- Cost-Effectiveness: Most people already have access to Excel. No need to pay for additional software.
- Visualizations: Create charts and graphs to visualize your spending and track progress.
- Data Storage: Keep all your budget information in one organized file.
Creating Your DIY Budget Planner in Excel: A Step-by-Step Guide
Step 1: Setting Up Your Spreadsheet
Open Excel and create a new blank workbook. The first step is to set up the basic structure of your budget planner.
- Column Headers: In the first row, enter the following column headers:
- Item/Description: This column will describe each expense.
- Category: Categorize your expenses (e.g., Materials, Tools, Labor, Permits).
- Estimated Cost: Your initial estimate for each item.
- Actual Cost: The actual amount you spent on each item.
- Difference: The difference between the estimated and actual cost (Actual Cost – Estimated Cost). This will highlight over or underspending.
- Notes: Use this column for any relevant notes or details about the expense.
- Freeze Panes: Select the row below your headers (row 2). Go to the “View” tab and click “Freeze Panes” > “Freeze Top Row”. This will keep your headers visible as you scroll down.
- Format Cells: Format the “Estimated Cost” and “Actual Cost” columns as currency (select the columns, right-click, choose “Format Cells,” select “Currency,” and choose your currency symbol). The “Difference” column should also be formatted as currency.
Step 2: Defining Your Project Categories
Categorizing your expenses is crucial for tracking where your money is going. Common categories for DIY projects include:
- Materials: Lumber, paint, tiles, hardware, etc.
- Tools: New tools you need to purchase or rent.
- Labor: If you’re hiring any help (e.g., electrician, plumber).
- Permits: Building permits, electrical permits, etc.
- Decor/Finishing: Fixtures, accessories, landscaping.
- Unexpected Costs: A buffer for unforeseen expenses (always include this!).
Add these categories (or categories relevant to your project) to a separate sheet within the workbook. Name this sheet “Categories.” List each category in a single column. This will be used for data validation in the main budget sheet.
Step 3: Entering Your Estimated Costs
This is the most crucial step. Research and estimate the cost of each item as accurately as possible.
- Detailed Breakdown: Break down the project into smaller, manageable tasks. For example, instead of “Bathroom Renovation,” list “Demolition,” “Plumbing,” “Electrical,” “Tile Installation,” etc.
- Research Prices: Use online resources (e.g., Home Depot, Lowe’s), local stores, and catalogs to get accurate price estimates for materials. Don’t forget to factor in sales tax.
- Tool Rental/Purchase: Determine which tools you need and whether it’s more cost-effective to rent or buy them.
- Labor Quotes: Get multiple quotes from contractors if you’re hiring any help.
- Permit Fees: Contact your local building department to determine permit fees.
- Contingency Fund: Add a line item for “Unexpected Costs” and allocate at least 10-15% of your total estimated cost to this category. DIY projects often uncover hidden problems.
- Data Validation for Categories: In your main budget sheet, select the entire “Category” column. Go to the “Data” tab and click “Data Validation.” Choose “List” from the “Allow” dropdown. In the “Source” box, click the sheet name “Categories” and select the list of categories you created. This will create a dropdown list in each cell of the “Category” column, ensuring consistency and preventing errors.
Step 4: Tracking Actual Costs
As you purchase materials and incur expenses, record the actual cost in the “Actual Cost” column. Be diligent about updating this column regularly.
- Keep Receipts: Save all your receipts and invoices.
- Update Regularly: Don’t wait until the end of the project to update your spreadsheet. Update it at least weekly (or even daily) to stay on top of your spending.
- Be Specific: Record exactly what you bought and from where.
Step 5: Calculating the Difference and Monitoring Your Budget
Excel will automatically calculate the difference between your estimated and actual costs, allowing you to quickly identify areas where you’re over or underspending.
- Difference Formula: In the first cell of the “Difference” column (e.g., E2), enter the following formula: `=D2-C2` (assuming “Actual Cost” is in column D and “Estimated Cost” is in column C).
- Copy the Formula: Drag the small square at the bottom-right corner of cell E2 down to apply the formula to all the rows in your budget.
- Conditional Formatting: Use conditional formatting to visually highlight overspending. Select the “Difference” column. Go to the “Home” tab, click “Conditional Formatting,” choose “Highlight Cells Rules,” and select “Greater Than.” Enter “0” in the box. Choose a red fill color (or any color you prefer) to highlight cells where the difference is positive (meaning you’ve spent more than estimated). You can also add another rule to highlight underspending (less than 0) in green.
- Total Estimated Cost: At the bottom of the “Estimated Cost” column, use the `SUM` function to calculate the total estimated cost of the project: `=SUM(C2:C100)` (adjust the range as needed).
- Total Actual Cost: At the bottom of the “Actual Cost” column, use the `SUM` function to calculate the total actual cost of the project: `=SUM(D2:D100)` (adjust the range as needed).
- Total Difference: At the bottom of the “Difference” column, use the `SUM` function to calculate the total difference between estimated and actual costs: `=SUM(E2:E100)` (adjust the range as needed).
Step 6: Analyzing Your Spending
Regularly review your budget and identify areas where you can potentially save money.
- Identify Overspending: Focus on the items highlighted in red in the “Difference” column. Why did you overspend? Was it due to unexpected price increases, material waste, or changes in the project scope?
- Look for Savings: Can you find cheaper alternatives for materials? Can you reduce labor costs by doing some of the work yourself?
- Adjust Your Budget: If you consistently overspend in certain categories, consider increasing your budget for those categories. However, make sure you offset the increase by finding savings elsewhere.
Step 7: Visualizing Your Data (Optional)
Excel’s charting capabilities can help you visualize your spending and track progress.
- Pie Chart of Category Spending: Select the “Category” column and the corresponding “Actual Cost” column. Go to the “Insert” tab and choose a pie chart. This will show you the proportion of your total spending allocated to each category.
- Column Chart Comparing Estimated and Actual Costs: Select the “Item/Description” column, “Estimated Cost” column, and “Actual Cost” column. Go to the “Insert” tab and choose a column chart. This will allow you to visually compare your estimated and actual costs for each item.
Tips for Success
- Be Realistic: Don’t underestimate the cost of materials or the amount of time the project will take.
- Be Detailed: The more detailed your budget, the better you’ll be able to track your spending.
- Update Regularly: Keep your spreadsheet up-to-date to get an accurate picture of your finances.
- Be Flexible: DIY projects rarely go exactly as planned. Be prepared to adjust your budget as needed.
- Don’t Be Afraid to Ask for Help: If you’re unsure about something, ask a professional or experienced DIYer for advice.
By following these steps, you can create a comprehensive DIY project budget planner in Excel that will help you stay on track, avoid overspending, and successfully complete your project.
“`
 2550×3300 diy project planner printable project planner handcrafted life from ourhandcraftedlife.com
  800×418 project budget excel template exceldatapro from exceldatapro.com
  1200×673 project budget spreadsheet project budget from db-excel.com
  1024×1325 project budget spreadsheet sample project budget spreadsheet from db-excel.com
  1440×1113 sample project budget spreadsheet excel google spreadshee sample from db-excel.com
 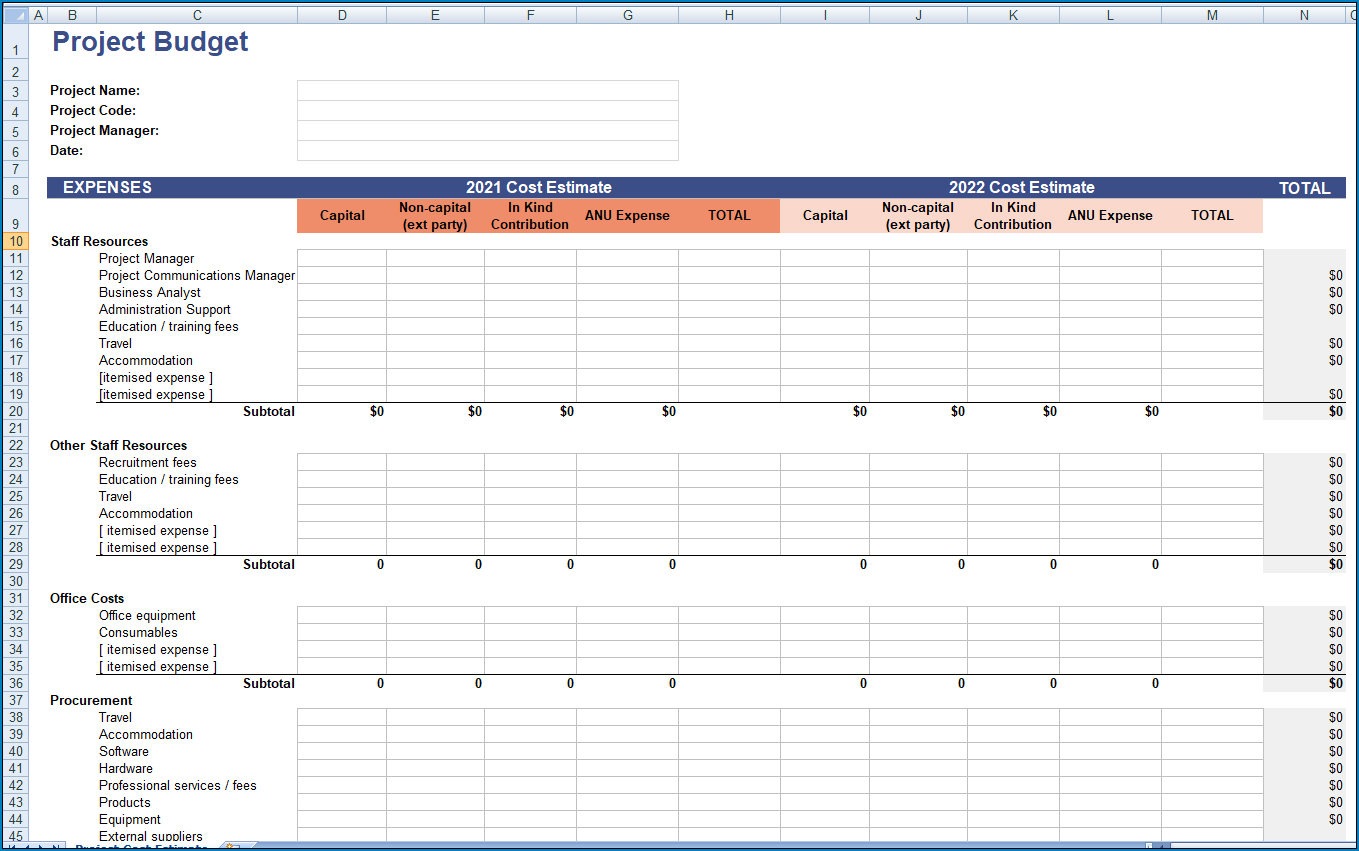 1359×851 printable project budget template excel from www.templateral.com
  1024×452 project budget plan template excel excelonist from www.excelonist.com
  1164×662 project budget template excel excel templates from www.exceltemplate123.us


DIY Project Budget Planner Excel :
DIY Project Budget Planner Excel was posted in June 11, 2025 at 4:06 pm. If you wanna have it as yours, please click the Pictures and you will go to click right mouse then Save Image As and Click Save and download the DIY Project Budget Planner Excel Picture.. Don’t forget to share this picture with others via Facebook, Twitter, Pinterest or other social medias! we do hope you'll get inspired by SampleTemplates123... Thanks again! If you have any DMCA issues on this post, please contact us!
Related For DIY Project Budget Planner Excel
Small Business Monthly Budget Templ
Small Business Monthly Budget Template Small Business Monthly Budget
Project Preparing Budget Proposal T
Project Preparing Budget Proposal Template Company Invoice Template DownloadStudent
Twelve Month Business Budget Cash F
Twelve Month Business Budget Cash Flow Free Personal Budget